
🚨 CRITICAL: Claude Code does NOT run natively on Windows. This guide shows you how to install it properly using Windows Subsystem for Linux (WSL).
Prerequisites & System Requirements
Required System Specifications
- Windows 10 (Build 19041 or higher) or Windows 11
- 4GB RAM minimum (16GB recommended for optimal performance)
- WSL 2 support (WSL 1 is not compatible)
- Active internet connection for downloads and authentication
Required Accounts
- Anthropic Console account with billing enabled, OR
- Claude Pro/Max subscription for authentication
Critical Platform Warning
⚠️ Claude Code explicitly blocks Windows installation with "os":"!win32" in its package configuration. Attempting to install directly on Windows will fail with an “Unsupported OS” error.
Installing WSL 2
Step 1: Enable WSL
Open PowerShell as Administrator and run:
wsl --installIf you encounter execution policy errors, first run:
Set-ExecutionPolicy -ExecutionPolicy RemoteSigned -Scope CurrentUserStep 2: Set WSL 2 as Default
wsl --set-default-version 2Step 3: Restart Your Computer
⚠️ MANDATORY: A complete system restart is required for WSL to function properly.
Step 4: Verify Installation
After restart, open PowerShell and run:
wsl --list --verboseYou should see output similar to this:
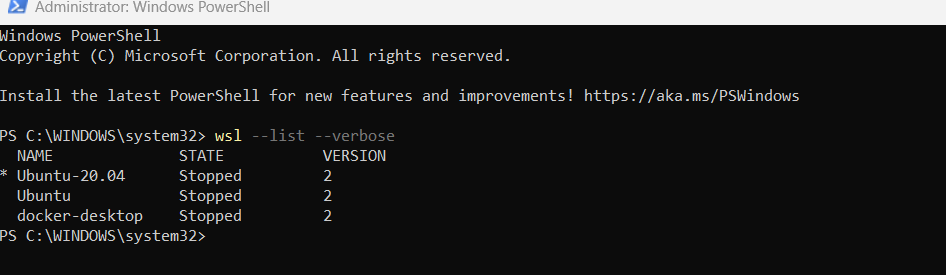
✅ Success indicator: All distributions should show “VERSION 2”
Setting up Node.js in WSL
Step 1: Launch Ubuntu
From Start menu, search for “Ubuntu” or run wsl in PowerShell.
Step 2: Update System Packages
sudo apt update && sudo apt upgrade -yStep 3: Install Node.js using NVM (Recommended)
Why NVM? Node Version Manager provides better version control and avoids permission issues common with direct installations.
# Install NVM
curl -o- https://raw.githubusercontent.com/nvm-sh/nvm/v0.39.7/install.sh | bash

# Reload bash configuration
source ~/.bashrc

# Install Node.js 18+ (Required for Claude Code)
nvm install 18
nvm use 18
Alternative: Direct Installation via apt
sudo apt install nodejs npmStep 4: Verify Node.js Installation
node --version  # Should show v18.x.x or higher
npm --version   # Should show 9.x.x or higher
Configuring npm Safely
🚨 CRITICAL: Avoid sudo with npm
NEVER use sudo npm install -g as this creates security risks and permission issues that Anthropic explicitly warns against.
Step 1: Create User-Level Global Directory
mkdir -p ~/.npm-global
npm config set prefix ~/.npm-global
Step 2: Update PATH Environment
echo 'export PATH=~/.npm-global/bin:$PATH' >> ~/.bashrc
source ~/.bashrc
Step 3: Verify Configuration
npm config get prefix
# Should output: /home/yourusername/.npm-global
Installing Claude Code
Step 1: Install via npm
npm install -g @anthropic-ai/claude-codeExpected output: Package installation without sudo prompts or permission errors.
Step 2: Verify Installation
claude --versionStep 3: Navigate to Your Project Directory
# For Windows projects (slower due to cross-filesystem operations)
cd /mnt/c/Users/YourUsername/Documents/YourProject

# For optimal performance, use WSL native filesystem
mkdir -p ~/projects/your-project
cd ~/projects/your-project
Authentication Setup
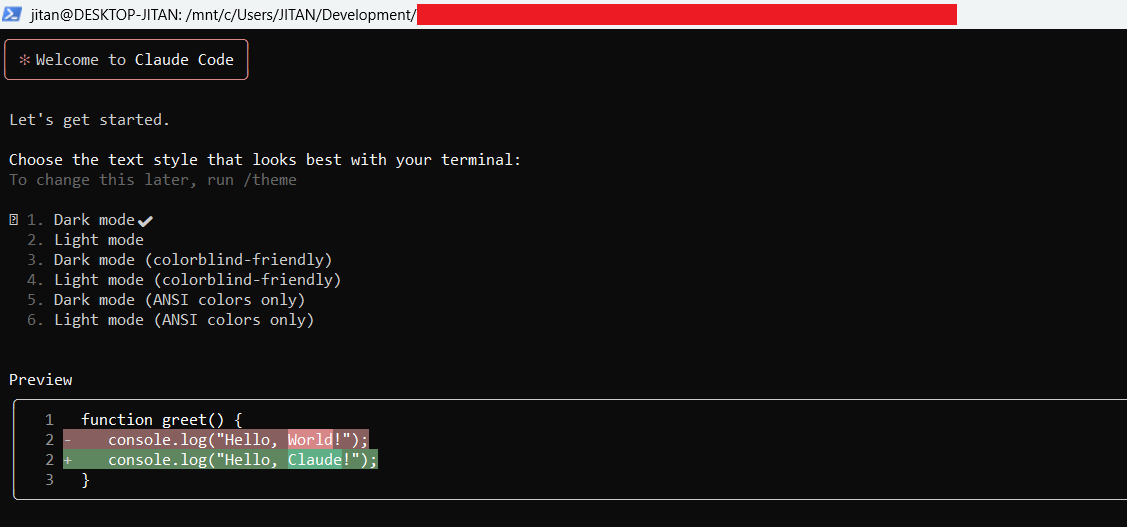
Step 1: Initialize Claude Code
claudeYou’ll see the welcome screen:
Step 2: Browser Authentication
Claude Code will provide a URL for authentication. Copy and paste it into your browser.
Two authentication options:
- Anthropic Console: Requires active billing at console.anthropic.com
- Claude App: For Claude Pro/Max subscribers
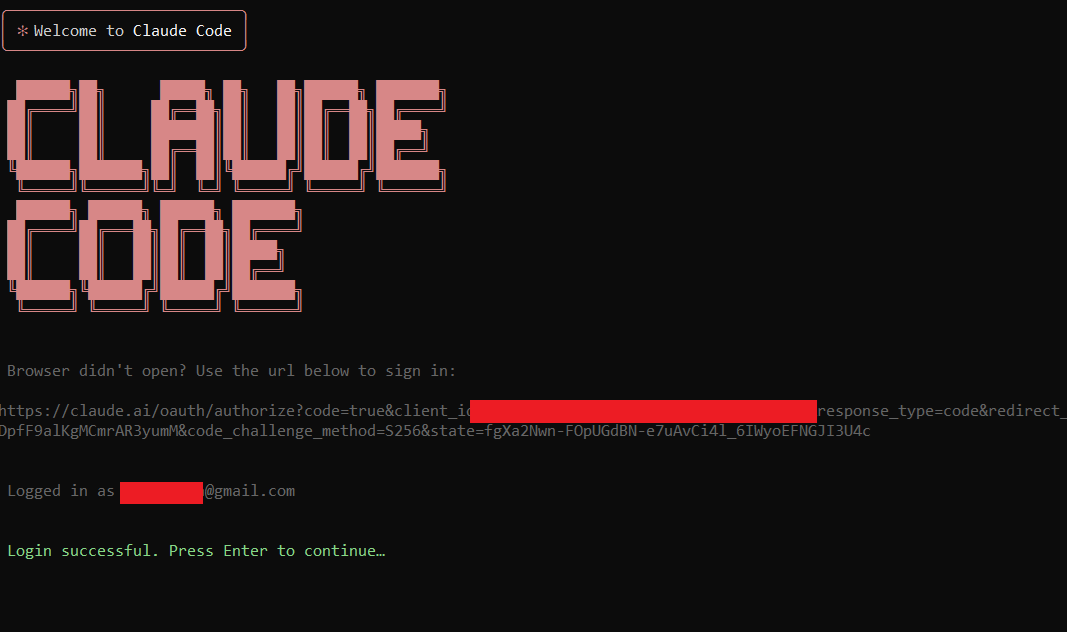
Step 3: Complete Authentication
After successful browser authentication, return to your terminal and press Enter to continue.
✅ Success indicator: “Login successful. Press Enter to continue…”
IDE Integration
Visual Studio Code Setup
Step 1: Install VS Code WSL Extension
code --install-extension ms-vscode-remote.remote-wslStep 2: Open Project in VS Code
cd your-project-directory
code .
Step 3: Use Integrated Terminal
- Open VS Code’s integrated terminal (Ctrl + `)
- Run
claudefrom within VS Code - Use Ctrl+Esc for Claude Code shortcuts
Verification & Testing
Step 1: Version Check
claude --versionStep 2: Create Test Project
mkdir test-claude-project
cd test-claude-project
git init
claude
Step 3: Test Basic Commands
# Within Claude Code interface
/help          # Show available commands
/init          # Initialize project settings
/ide           # Test IDE integration
Step 4: Verify IDE Connection
- Open VS Code in your test project
- Launch integrated terminal
- Run
claude - Use
/idecommand to establish connection
Troubleshooting Common Issues
”Claude Code is not supported on Windows”
Problem: Attempting installation in Windows PowerShell/CMD
Solution: Only install and run within WSL environment
Permission Errors During Installation
Problem: npm tries to install in system directories Solution: Use the user-level npm configuration outlined above
# Reset npm configuration if needed
npm config delete prefix
npm config set prefix ~/.npm-global
”exec: node: not found”
Problem: WSL attempting to use Windows Node.js
Solution: Reinstall Node.js within WSL using Linux package managers
Slow Performance
Problem: Cross-filesystem operations between WSL and Windows
Solutions:
- Work within WSL’s native filesystem (
~/projects/) - Or optimize with .wslconfig:
Create C:\Users\YourUsername\.wslconfig:
[wsl2]
memory=8GB
processors=4
swap=2GB
Conclusion
Installing Claude Code on Windows requires understanding that it’s fundamentally a Linux application running through WSL. The key to success is:
- Proper WSL 2 setup with complete system restart
- Correct npm configuration to avoid permission issues
- WSL-native development for optimal performance
- Proper authentication with active billing or subscription